SBOMs
The Software Bill of Materials (SBOMs) lists all components, including licenses and dependencies contained in a software product and other data, including checksums. SBOMs can be used to identify all your software components and improve supply chain security.
An SBOM in a known format like SPDX or CycloneDX can help drive automation and trigger security alerts. Software end-users can use the SBOM to perform vulnerability and license analysis of their software packages, which can help evaluate risk in a software product.
This guide explains how to manage and verify SBOMs with Cloudsmith.
In the examples below we will use the following identifiers:
| Identifier | Description |
|---|---|
| WORKSPACE | Your Cloudsmith account name or workspace |
| REPOSITORY | Your Cloudsmith Repository name |
| IMAGE_NAME | The name of your Docker image |
| TAG | A tag for your Docker image |
| SBOM | An SBOM in a standard format supported by cosign, SPDX, SWID, Cyclone DX |
| DIGEST | sha256:<digest-value> |
Automatic generation of SBOMs for container images
Cloudsmith will automatically generate CycloneDX format SBOMs during container image package synchronization. SBOMs generated this way can be retrieved via the packages API.
For example, to retrieve generated SBOMs for Docker images in a repository, the following cURL command can be used (specifying the format using ?q="format:docker"):
curl -sH "X-Api-Key: <api-key>" https://api.cloudsmith.io/v1/packages/WORKSPACE/REPOSITORY/?q="format:docker"Generated SBOMs will be returned in the response payload files field, with a tag value of sbom-cyclonedx as shown in the example response payload below:
"files" : [
  {
    "cdn_url" : "https://dl.cloudsmith.io/basic/WORKSPACE/REPOSITORY/docker/<identifier>.sbom-cyclonedx.json",
    "checksum_md5" : "dbbff381d1de3feb65c125a4a599c136",
    "checksum_sha1" : "bbeee0f7e9b3a69ac5eec6a9137ea355cffabfef",
    "checksum_sha256" : "7ba61e9879422111330cdfc2023fa5719a080d491d18f9be73313465e3ad5a9e",
    "checksum_sha512" : "f3fe2e47bd5418308bda7f8421f99c3f5c8d2002e49b77c0bb05c1c12c9f58c6d76822426fdbf18f7cd10e1aa4ea472c40c8dbcae1195ebab9369b54e668ec69",
    "downloads" : 0,
    "filename" : "<identifier>.sbom-cyclonedx.json",
    "is_downloadable" : true,
    "is_primary" : false,
    "is_synchronised" : true,
    "signature_url" : "https://dl.cloudsmith.io/basic/WORKSPACE/REPOSITORY/<identifier>/gpg.<identifier>.asc",
    "size" : 1040,
    "slug_perm" : "<identifier>",
    "tag" : "sbom-cyclonedx"
  },
  ...
],
...
Docker Images: Signing and Verifying SBOMs with Cosign
Cloudsmith integrates with Cosign, an OCI artifact signing and verification solution that is part of the SigStore project. Cosign supports container signing, verification and storage in an OCI registry.
Follow the next steps to sign and verify a docker image IMAGE_NAME:latest:
-
Build, tag, and push your Docker image to your Cloudsmith repository:
bashdocker build -t IMAGE_NAME:latest . docker tag IMAGE_NAME:latest docker.cloudsmith.io/WORKSPACE/REPOSITORY/IMAGE_NAME:latest docker push docker.cloudsmith.io/WORKSPACE/REPOSITORY/IMAGE_NAME:latest -
Retrieve the Digest for the Image. To retrieve the digest for the image you just pushed, you can inspect it using the following command:
bashdocker inspect --format='{{index .RepoDigests 0}}' docker.cloudsmith.io/WORKSPACE/REPOSITORY/IMAGE_NAME:latestExtract the digest part from this output (
sha256:<digest-value>) for use in Cosign commands.Use Digest over Tags
Cosign recommends using image digests instead of tags to ensure you’re signing the exact intended image version. Tags can change over time, while digests are unique to specific image versions.
-
Generating an SBOM. There are a number of tools to generate an SBOM, including Trivy, Cyclone DX and Syft. Below is how to generate an SBOM of a Docker image with Syft:
bashsyft docker.cloudsmith.io/WORKSPACE/REPOSITORY/IMAGE_NAME:latest -o spdx-json > sbom.spdx.json -
Attest the SBOM using Cosign: Now, sign the SBOM file using Cosign and the digest, rather than the image tag:
bashcosign attest --type spdxjson --yes --predicate sbom.spdx.json docker.cloudsmith.io/WORKSPACE/REPOSITORY/IMAGE_NAME@DIGESTThis command will output something like the following:
textGenerating ephemeral keys... Retrieving signed certificate... The sigstore service, hosted by sigstore a Series of LF Projects, LLC, is provided pursuant to the Hosted Project Tools Terms of Use, available at https://lfprojects.org/policies/hosted-project-tools-terms-of-use/. Note that if your submission includes personal data associated with this signed artifact, it will be part of an immutable record. This may include the email address associated with the account with which you authenticate your contractual Agreement. This information will be used for signing this artifact and will be stored in public transparency logs and cannot be removed later, and is subject to the Immutable Record notice at https://lfprojects.org/policies/hosted-project-tools-immutable-records/.- During the Cosign attestation process, an ephemeral certificate is generated using OIDC authentication to ensure the signer’s identity.
- The attestation, along with the certificate, is recorded in Sigstore’s immutable transparency log, providing a permanent record of the artifact’s authenticity and provenance.
- A browser-based authentication step verifies the user’s identity, and the resulting signed certificate and transparency log entry ID are displayed for reference.
-
Verifying the SBOM Attestation. After signing, verify the image and its associated attestation. This command checks that the image was signed by the specified identity and verifies the OIDC issuer:
bashcosign verify \ --certificate-identity "your-username/your-repo/.github/workflows/workflow.yml@refs/heads/main" \ --certificate-oidc-issuer https://token.actions.githubusercontent.com \ docker.cloudsmith.io/WORKSPACE/REPOSITORY/IMAGE_NAME:latestAbout the --certificate-oidc-issuer Flag
- The --certificate-oidc-issuer flag specifies the trusted OIDC provider. In this example, GitHub Actions
https://token.actions.githubusercontent.comserves as the issuer, verifying the identity of the entity signing the image. - You can use other OIDC providers (e.g., Google, Azure AD) as issuers depending on your organization’s identity setup, offering flexibility to integrate with your existing infrastructure.
- The --certificate-oidc-issuer flag specifies the trusted OIDC provider. In this example, GitHub Actions
-
Retrieving the Signed SBOM: We can download the SBOM using the command below:
bashcosign download attestation docker.cloudsmith.io/ciara-demo/cosign-test/test@sha256:d7a7ed92bf99090997e3a62830f611369ac3fac7a61bb38fb244234640f0c24a | jq -r .payload | base64 -d | jq .predicate
Storing SBOMs Inside Packages
For non-Docker artifacts, SBOMs can be stored directly within packages, providing a persistent, portable record of dependencies and licenses.
Maven
You can generate and include an SBOM using a Maven plugin for Java packages.
This step-by-step guide walks you through generating an SBOM for a Maven project, attaching it, and deploying it to Cloudsmith. We use thecyclonedx-maven-plugin to generate the SBOM in SPDX format:
-
Build the Maven project:
bashmvn clean packageThis command compiles your project and packages it into a deployable artifact, such as a
.jarfile. -
Generate the SBOM. To create an SBOM, use the cyclonedx-maven-plugin. This plugin is specifically designed to generate SBOMs for Maven projects in the CycloneDX format, which is widely compatible with security and compliance tools.
-
Add the CycloneDX plugin to your project:
In your pom.xml file, add the following plugin configuration:xml<build> <plugins> <plugin> <groupId>org.cyclonedx</groupId> <artifactId>cyclonedx-maven-plugin</artifactId> <version>2.9.0</version> </plugin> </plugins> </build> -
Run the SBOM generation:
bashmvn org.cyclonedx:cyclonedx-maven-plugin:makeAggregateBomThis command generates an SBOM file, typically in the target directory, as
bom.xml.
-
-
Configure Cloudsmith for Deployment. To do so, set up Cloudsmith credentials to deploy the package with its SBOM included. Update Maven settings with Cloudsmith credentials, by modifying or creating the
~/.m2/settings.xmlfile, adding your Cloudsmith credentials (replace placeholders as necessary):xml<settings> <servers> <server> <id>cloudsmith</id> <username>${env.CLOUDSMITH_USER}</username> <password>${env.CLOUDSMITH_API_KEY}</password> </server> </servers> </settings> -
Deploy the Maven Package with SBOM to Cloudsmith. With the SBOM generated and Cloudsmith credentials configured, deploy the artifact along with the SBOM.
bashmvn deploy -s ~/.m2/settings.xmlThis command uploads the Maven artifact and its embedded SBOM to Cloudsmith under the specified repository.
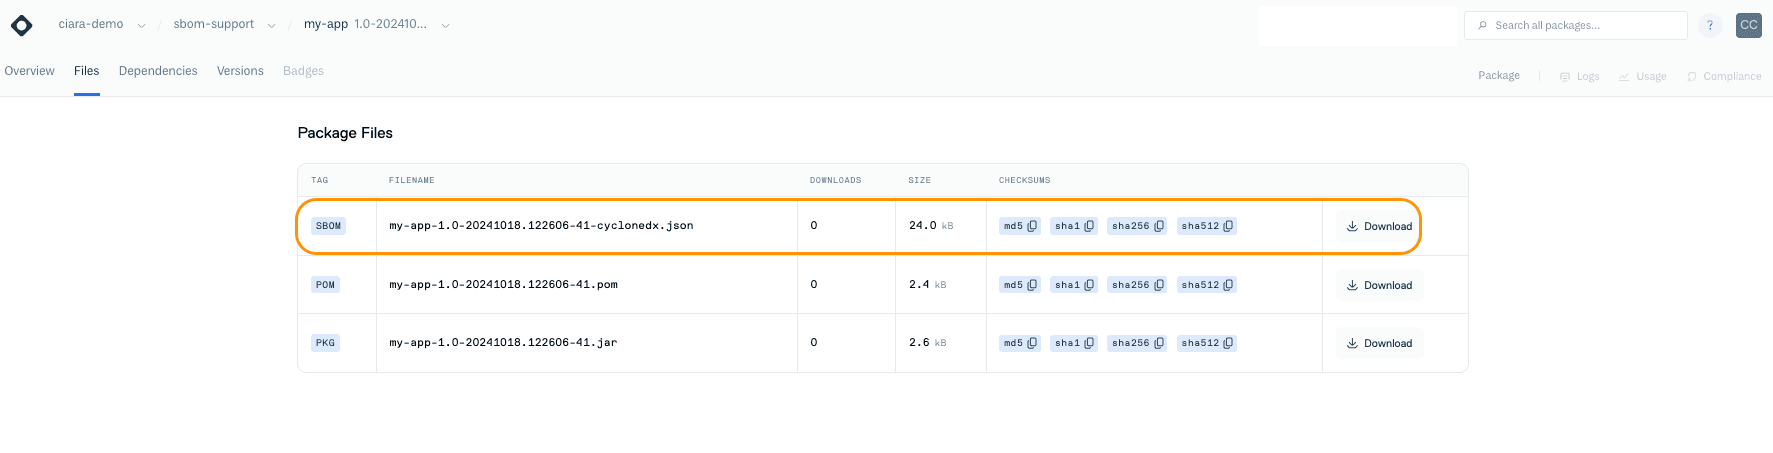
-
Use the SBOM.You can view and download the SBOM from the Cloudsmith UI. Select your Maven artifact and then click on the Files tab where you can download the SBOM.