Integrations
Azure DevOps
Effortlessly integrate Cloudsmith with Azure DevOps to securely manage artifacts and automate deployments.
Introduction
Cloudsmith integrates directly with Azure DevOps using OpenID Connect (OIDC) — enabling secure, short-lived authentication without Azure Entra app registrations or long-lived credentials.
This guide explains how to configure Cloudsmith and Azure DevOps to authenticate pipelines and access Cloudsmith repositories seamlessly.
What You’ll Need
Before getting started, ensure you have:
- An Azure DevOps organization and project with permissions to create pipelines.
- A Cloudsmith workspace (organization) with access to manage service accounts and OIDC providers.
- The Cloudsmith CLI Setup & Authenticate Azure DevOps extension installed.
Integration Features
- Native OIDC Authentication – Azure DevOps issues short-lived tokens that Cloudsmith exchanges for temporary API keys (~90-minute lifetime).
- Automatic CLI Setup – Optionally installs and authenticates the Cloudsmith CLI for use in your pipeline.
- Cross-Platform – Works on Linux, Windows, and macOS agents.
- No Entra App Needed – Uses Azure DevOps’ native OIDC provider directly.
Step 1: Create an OIDC Provider in Cloudsmith
-
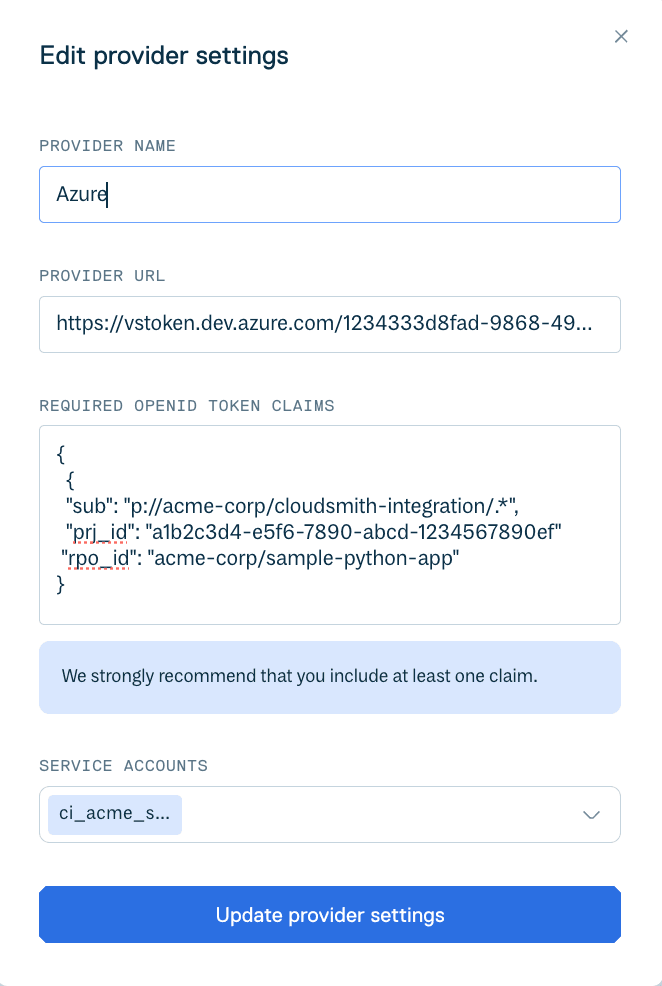
In your Cloudsmith workspace, go to Settings → Authentication → OpenID Connect → Create Provider.
-
Fill in the following details:
-
Provider Name:
azure-devops -
OIDC Provider URL:
https://vstoken.dev.azure.com/<ORG_GUID>Replace
<ORG_GUID>with your Azure DevOps organization ID (GUID).
You can find it at
https://app.vssps.visualstudio.com/_apis/accounts — look for the"AccountId"value that corresponds to your organization, for example:json{"AccountId": "12345678-abcd-4321-ef00-987654321000", "AccountName": "acme-corp"} -
Recommended Token Claims: We strongly recommend including at least one claim to control which Azure DevOps pipelines can authenticate with Cloudsmith.
Claims help ensure that only specific projects or repositories within your organization can access a given Cloudsmith service account.Example:
json{ "sub": "p://acme-corp/cloudsmith-integration/.*", "prj_id": "a1b2c3d4-e5f6-7890-abcd-1234567890ef" }Explanation:
sub— Identifies the Azure DevOps organization and project.
In this example, only pipelines in thecloudsmith-integrationproject of theacme-corporganization can authenticate.
The.*wildcard allows all pipelines in that project to use the same Cloudsmith OIDC mapping.prj_id— The Azure DevOps project ID (GUID). You can use this for tighter scoping if needed.
You can view your Azure DevOps organization and project IDs using:
https://app.vssps.visualstudio.com/_apis/accounts — this lists your organization GUIDs and other identifiers that also appear as claims in your Azure DevOps OIDC tokens.Wildcard usage
Wildcards are only supported at the end of a claim value.
For example:p://acme-corp/cloudsmith-integration/* -
Service Accounts: Select the Cloudsmith service account(s) that this provider will authenticate (for example,
ado-builds-service).
-
-
Click Create Settings to save.
Token lifetime
Azure DevOps OIDC tokens last roughly 90 minutes.
The Cloudsmith Azure DevOps task automatically exchanges these for temporary Cloudsmith API keys during each pipeline run.

Step 2: Add the Cloudsmith Task to Your Azure Pipeline
Install the Cloudsmith CLI Setup & Authenticate Azure DevOps extension.
It handles both OIDC authentication and optional CLI installation.
Example pipeline using native Azure DevOps OIDC:
# azure-pipelines.yml
trigger:
- main

pool:
  vmImage: 'ubuntu-latest'

variables:
  # ---- Cloudsmith settings ----
  CS_WORKSPACE: 'example-workspace'
  CS_REPO: 'backend-app'
  CS_SERVICE_SLUG: 'ado_build_service'   # Cloudsmith service account slug

steps:
- checkout: self

# Authenticate to Cloudsmith via OIDC (no Entra setup required)
- task: CloudsmithCliSetupAndAuthenticate@1.1.1
  displayName: "Cloudsmith: Authenticate via OIDC"
  inputs:
    authMethod: 'oidc'
    oidcAuthOnly: false       # install CLI so 'cloudsmith whoami' works
    pipInstall: false
    cliVersion: ''
    oidcNamespace: '$(CS_WORKSPACE)'
    oidcServiceSlug: '$(CS_SERVICE_SLUG)'

# Example: install dependencies from a Cloudsmith-hosted Python repo
- task: UsePythonVersion@0
  inputs:
    versionSpec: '3.12'
  displayName: "Use Python 3.12"

- bash: |
    set -eo pipefail
    python -m pip install --upgrade pip
    pip install -r requirements.txt \
      --index-url "https://${CS_SERVICE_SLUG}:${CLOUDSMITH_API_KEY}@dl.cloudsmith.io/basic/${CS_WORKSPACE}/${CS_REPO}/python/simple/"
  displayName: "pip install from Cloudsmith"
  env:
    CLOUDSMITH_API_KEY: $(CLOUDSMITH_API_KEY)


## Step 3: Verify CLI Installation and Authentication

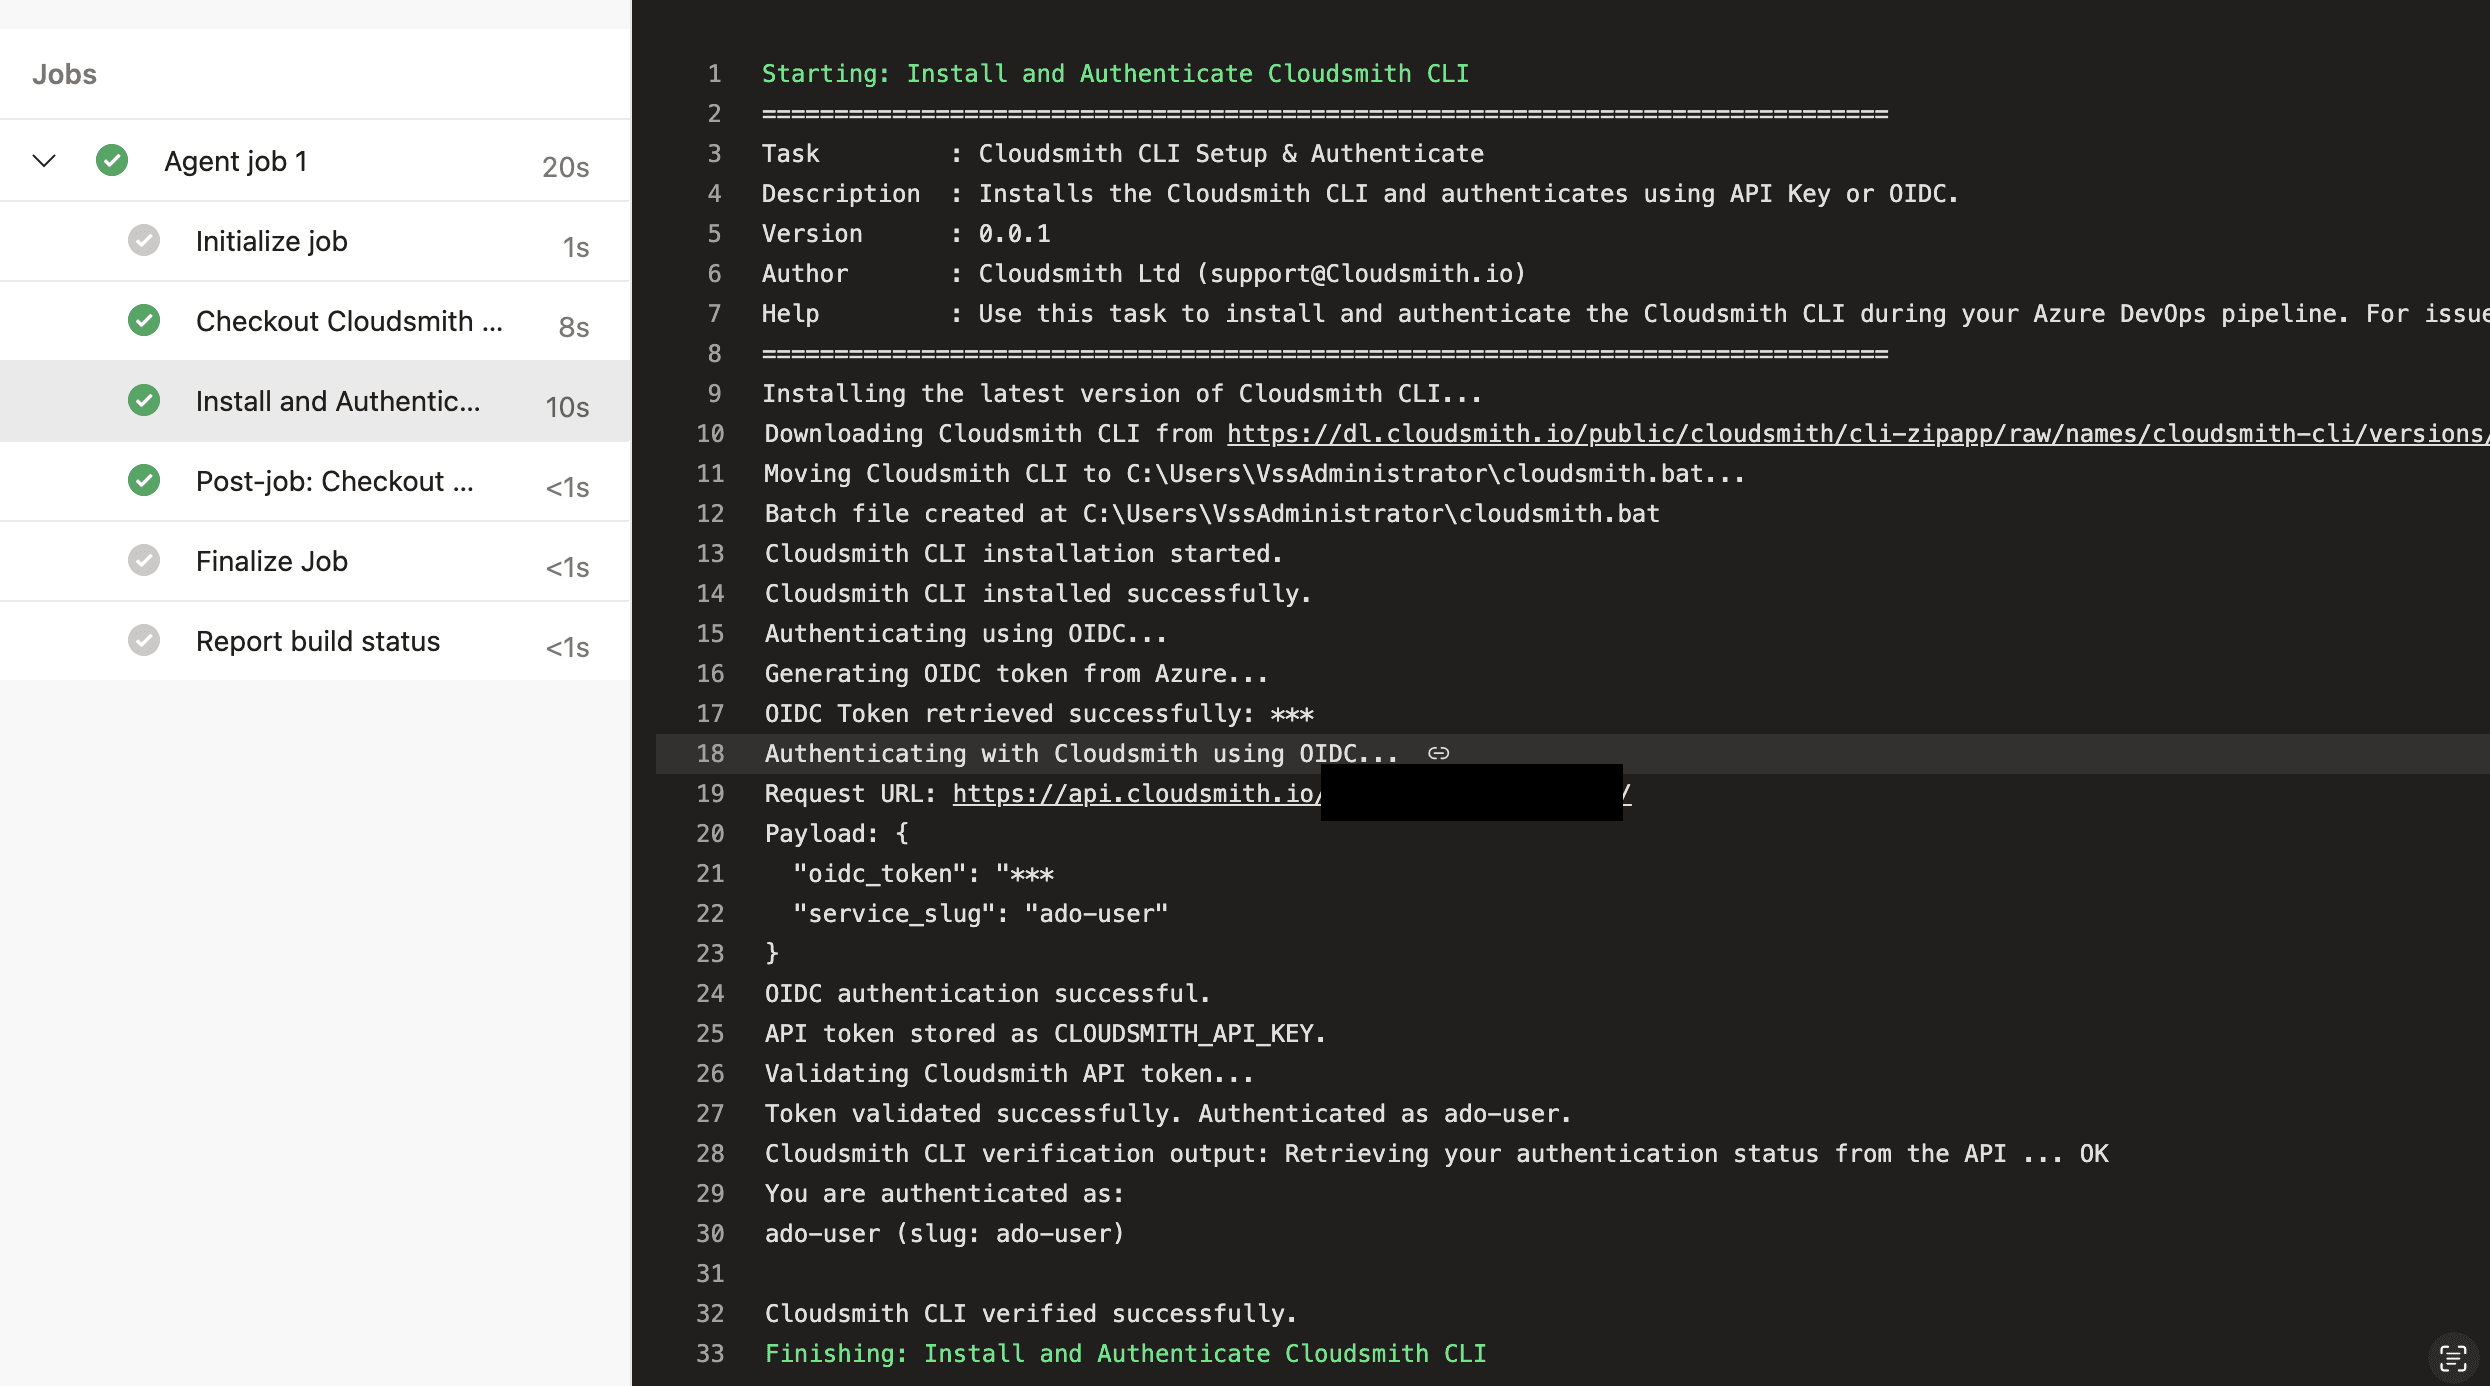
Save and run your pipeline to complete the setup.
After running the pipeline, the extension will install the Cloudsmith CLI, authenticate based on the chosen method, and validate the setup by running:

```bash
cloudsmith whoami
You can check the pipeline logs to confirm successful authentication.

Step 4: Start Using the Cloudsmith CLI Seamlessly in Your Pipeline
The following example demonstrates how to use the Cloudsmith CLI extension with OIDC authentication to push a package to Cloudsmith directly from an Azure DevOps pipeline:
trigger:
  branches:
    include:
      - main  # Trigger pipeline on changes to the main branch

pool:
  vmImage: 'ubuntu-latest'

steps:
  - task: CloudsmithCliSetupAndAuthenticate@1.1.1
    displayName: "Authenticate with Cloudsmith via OIDC"
    inputs:
      authMethod: 'oidc'
      oidcNamespace: '$(example-workspace)'
      oidcServiceSlug: '$(ado_build_service)'
      cliVersion: 'latest'

  # Example task: push a raw package to Cloudsmith
  - script: |
      cloudsmith push raw $(example-workspace)/$(backend-app) ./dist/my-package.zip
    displayName: "Push package to Cloudsmith"
Once authenticated, you can perform any Cloudsmith CLI operation — such as pushing, pulling, or managing packages — directly within your Azure DevOps pipeline.
Pipeline steps
Ensure that all pipeline steps that call the Cloudsmith CLI run on the same pipeline runner as the Cloudsmith authentication task.
Best Practices
- Use OIDC: Use OIDC authentication instead of API keys for enhanced security.
- Use Secure Variables: Store sensitive values (e.g.,
CLOUDSMITH_API_KEY, workspace/repo names) as Azure DevOps secrets rather than hard-coding them in YAML. - Use Latest CLI Versions: Keep the Cloudsmith CLI updated to leverage the latest features and security patches. If specific versions are required, specify them explicitly in your configuration.
Troubleshooting
- Authentication Issues:
- Ensure all authentication variables are correctly set and valid for either API Key or OIDC.
- Verify that the correct service account is selected in Cloudsmith for the OIDC provider.
- Permission Errors: Verify that the Azure DevOps agent has permission to download and install the CLI (for self-hosted agents).
- PATH Issues with Cloudsmith CLI: Ensure you’re using the same runner for all steps, as switching runners may lose CLI installation and configuration.
- OIDC authentication failures: Ensure the Provider URL exactly matches
https://vstoken.dev.azure.com/<ORG_GUID>for your organization. If you addedsubor other claims, confirm they match the token your pipeline issues.